
When the COVID-19 lockdowns hit, I found myself working from home. Since I was stuck at home, I decided that I needed a project to work on. Like many people, I found myself working from home. Working from home allowed me to run big, long running print jobs on my 3d printer without having to leave it unattended. I had recently gotten interested in learning to play the guitar, so what better way to learn than to make my own 3d printed guitar.
3d Model:
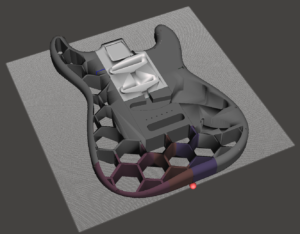
3d model of the plasticaster
I knew I wanted a Stratocaster style guitar, but I also knew that I don’t have the 3d modeling chops to create a model myself. I fired up Thingiverse and found a few models of Stratocaster bodies. The guitar I wound up printing was a honeycomb stratocaster based on a 3d model created by Conceptor on Thingiverse.
Edit: The original files have been removed from Thingiverse. I have uploaded the files that I made here: https://www.printables.com/model/145770-honeycomb-stratocaster-body-repositioned-pieces
Modifications:
I made the following modifications to the model before printing it on my printer.
- Joined all the pieces together and re-sliced them into smaller pieces
- Added holes & pegs to assist with alignment when gluing pieces together
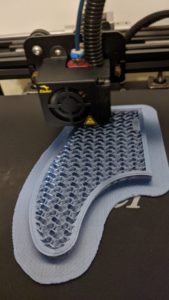
I sliced the model into smaller pieces to account for the smaller build plate of my Ender 5 than what the model was originally designed for. I also moved the seams where the pieces would glue up to minimize glue joints underneath the strings where the tension from the strings would be the highest.
Printing & Print Time:
I printed the guitar in Silk Blue PLA available at Amazon.
Here are the settings I used for my Ender 5.
- .2mm layer height
- 220 degree nozzle temp
- 60 degree bed temp
- 20% infill for most of the body
- 40% infill underneath the strings (higher stress from the string tension)
- Gyroid infill pattern
This took over 150 hours of printing time spread across 9 pieces and used between 2 and 2.5 kg of filament.
Assembly:
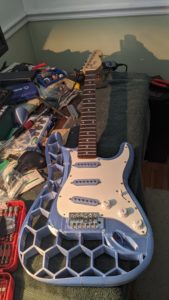
I sanded the mating surfaces and assembled them using super glue. I intentionally did not sand the surfaces of the guitar, since I wanted the look of the layer lines, however if I were to make another one I would probably sand the whole things since it would be more comfortable.
Guitar Components:
It took me some time to figure out what I wanted to do for the electronics and neck of the guitar. My main two choices were either:
- buy each component individually
- buy a beat up guitar and scavenge all the parts.
I priced out components individually and found that it would be cheaper to buy a cheap working guitar rather than individual pieces. This was the biggest delay in finishing the guitar. Finding a cheap guitar to tear apart took several months. When the COVID-19 lockdowns hit, people were suddenly stuck at home with nothing to do. This resulted in most local music shops being cleaned out of affordable guitars. Eventually I found a Mexican made Stratocaster on the site Reverb. I ordered it fully intending to strip the parts for my build. But as soon as it was delivered, I knew that I liked the guitar too much to tear it apart, so back to my reverb searches I went. Eventually I found an inexpensive Stratocaster clone that fit the bill.
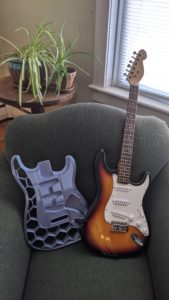
Plasticaster body with the donor guitar
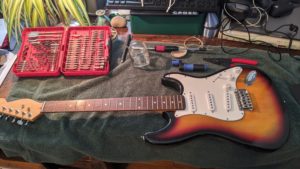
Stripping down the donor guitar
Everything fit together mostly as planned. During a dry fit of the electronics, I found that a one of the pick guard screws fell on a glue joint. In order to not split the joint I left that screw out of the finished assembly.
Testing the fit of the neck
I had to sand the sides of the neck in order to make it fit into the neck pocket of the guitar properly. This did not affect tuning at all since I sanded the sides of the neck, not the end of it. I did have some screw heads strip out during assembly. A quick run to the hardware store for some better quality screws and everything was fine.
Finishing Touches:
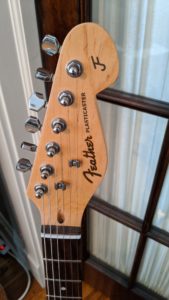
Waterslide Decals
I ordered some waterslide decal paper and made myself a set of decals for the headstock. The name ‘Plasticaster’ is a nod to the original design of the Stratocaster. As a tribute to Fender, I found a custom font that mimics the ‘Fender’ script and created my own headstock decal.
I plan to write a bit about using waterslide decals sometime soon. Keep an eye out for that if you are interested.
Here is a breakdown of the costs and time of my 3d printed guitar:
- Parts guitar: $160
- 3d printer filament: $60
- Misc. screws: $20
- Printer time: 150 hours
- Assembly time: 8 hours (first time building a guitar, so I took my time on this one)
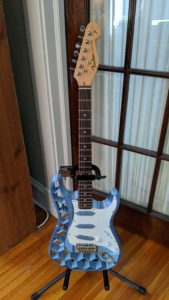
Finished Guitar
Overall, I wanted to make this guitar as a conversation starter, and to answer the question ‘can I print a guitar’. That was why I went inexpensive on the electronics. I did not want to invest a lot of money into high end components if the guitar was going to rip itself apart from the tension of the strings. I can say that 6 months later everything is holding together just fine. The tuning stability is about what you can expect from a guitar with unbranded tuning machines. At some point down the line I may upgrade this guitar with high end electronics and locking tuning machines, but for now it is good enough.
If anyone has any questions about making a 3d printed guitar, feel free to leave a comment or use the contact form to ask me anything.
3 comments
Incredible story there. What happened after? Take care! Dorie Justinian Voltz
hello, do you happen to still have the project files? the project link leads to a page that no longer exists, and I’m really into making this guitar
Hey Gus.
I have uploaded my files here: https://www.printables.com/model/145770-honeycomb-stratocaster-body-repositioned-pieces
Apparently the original creator of the files took down his version for some reason. If you do wind up making one definitely let me know!